0%

初识Verilator

Verilator的工作原理

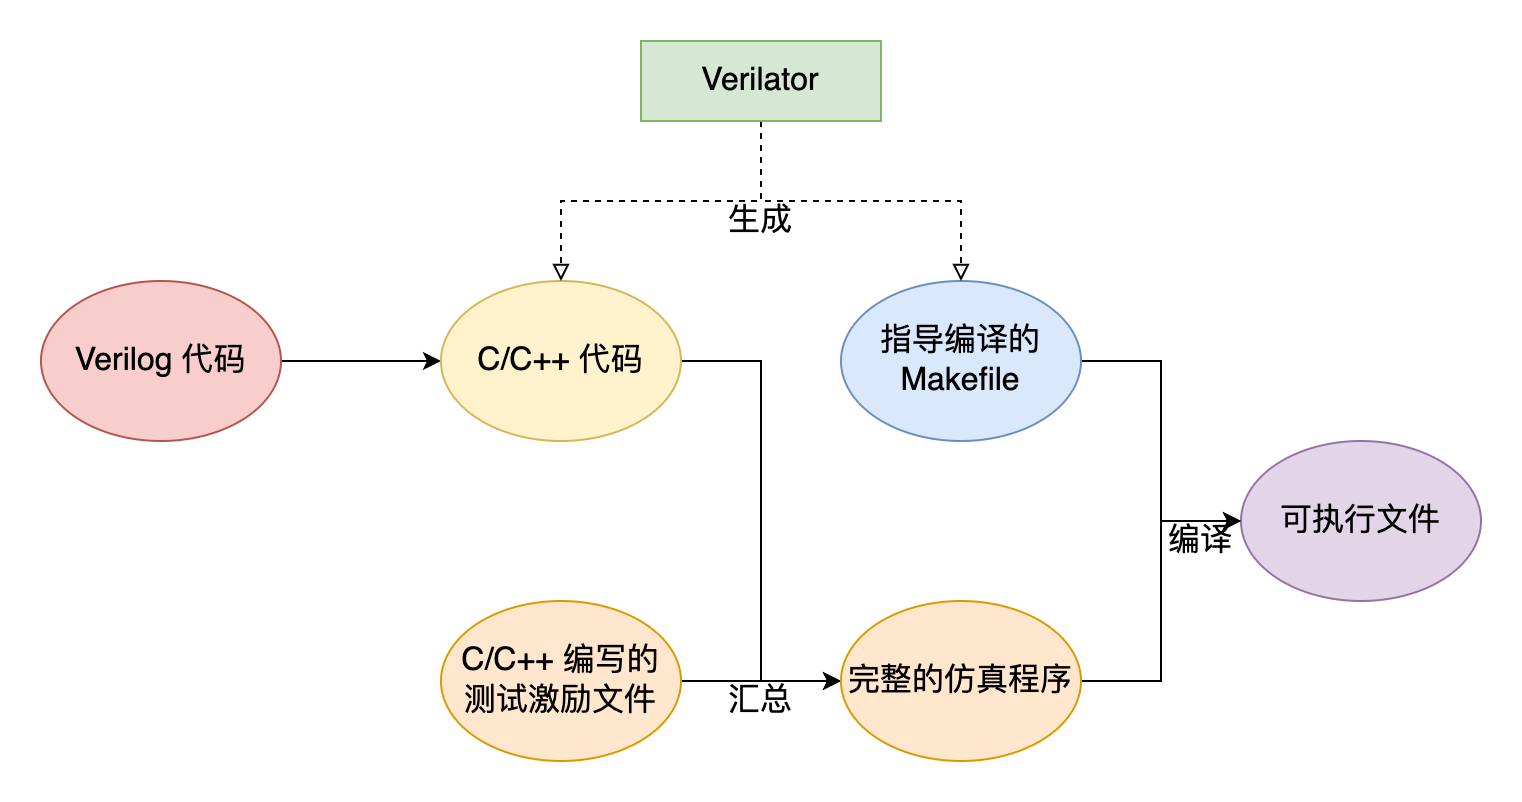
  • 我们需要使用 C++ 编写激励文件。显然,我们不能在 testbench 中直接调用我们 .v 中的模块,所以我们要通过 Verilator 将其转化为 C++ 文件再进行调用,Verilator 为我们提供了顶层模块输入/输出引脚的接口,使我们得以对顶层模块的输入信号赋值或读取其输出信号。

  • Verilator 会生成一个 Makefile 脚本,利用 GCC 等编译器将生成的 C++ 文件和我们编写的激励文件编译成成用于仿真的可执行文件。

Verilator Files

RTFM

Verilator Command

shell
1
man verilator

verilation(生成可供调用的 C++ 文件)

shell
1
 verilator --cc [--top <top-name>] VerilogSourcefile
  • --cc:指定将 Verilog 转化为 C++ 代码
  • --top:当有多个Verilog 源文件的时候需要指定顶层模块
  • -Wall:打开Verilator所有的警告
  • --Mdir <directory>: 更改output file的路径,默认路径是obj_dir

编写testbench

示例(双控开关)

top.v
1
2
3
4
5
6
7
module top(
input a,
input b,
output f
);
assign f = a ^ b;
endmodule
main.cpp
1
2
3
4
5
6
7
8
9
10
11
12
13
14
15
16
17
18
19
20
21
22
23
24
25
26
27
28
29
30
31
32
33
#include <stdio.h>
#include <stdlib.h>
#include <assert.h>
// 包含顶层模块的头文件
#include "Vtop.h"
#include "verilated.h"

int main(int argc, char** argv) {
VerilatedContext* contextp = new VerilatedContext; // 创建一个上下文对象
contextp->commandArgs(argc, argv);
Vtop* top = new Vtop{contextp}; // 在heap上构造一个对象 {}列表初始化
// 若上下文标记未完成,则一直循环
while (!contextp->gotFinish()) {
int a = rand() & 1;
int b = rand() & 1;
// 对top module的input进行复制
top->a = a;
top->b = b;
// 更新output
top->eval();
printf("a = %d, b = %d, f = %d\n", a, b, top->f);
assert(top->f == (a ^ b));
// 增加上下文的时间
contextp->timeInc(1);
if (contextp->time() > 3) {
contextp->gotFinish(true); //当上下文的时间超过3时标记完成
}
}
// 释放heap上面的对象
delete top;
delete contextp;
return 0;
}

生成可执行文件并运行

shell
1
 verilator --cc -Wall [--top <top-name>] VerilogSourcefile -exe testbenchfile 
  • -exe:其实这步就是将testbenchfile加入到生成的Makefile中
  • -bulid:构建可执行文件(自动执行Makefile),我们可以后面手动构建如果不加这个option

手动构建可执行文件

shell
1
make -C obj_dir -f Vtop.mk Vtop
  • -C: Change to directory dir before reading the makefiles or doing anything else.
  • -f: Use file as a makefile

最后的Vtop是make要构建的目标(Target)